« July 2008 |
Main
| September 2008 »
 August 28, 2008 | About Flatwound Strings
There are many choices in mandolin strings, and ultimately, a player will make a purchase decision based on tone considerations, finger feel and response, longevity. Personal experiences with even less measurability like string malfunction and breakage factor in; many players will completely write off a brand because of a few random incidents with a manufacturer's occasional blem. Although many like to experiment once in a while, most eventually settle in to a string that brings out the best in their own instrument, and creates a signature sound.
We were big on flatwound strings because of the smooth feel at first blush, but there are indeed tonal considerations which make a flatwound string ideal for jazz.
Brightness and the Overtone Series.
For the brass player, the overtone series actually makes up the entire range and sound of the instrument family (see What are harmonic overtones?), so the notion of open fifths and harmonics are very much second nature. Fretted string instruments have some experience playing harmonics on the 12th, 7th, and 5th frets, but not as much. It might be esoteric to dig too deeply into the exact structure; let's just say the timbre of the instrument is affected by how much the upper partials of a sound are emphasized.
A simple concrete example of this sound manipulation is as close as your mouth. Try singing a stable medium low pitch mouthing the syllable "Bah."
BAAHHHHHH. Sustain it five seconds or longer. Now do the same thing, same pitch but after 3 seconds, change the syllable to "Reeee."
BAAAHHHREEEEEEE. Don't change the pitch coming from your vocal chords. Notice how as your mouth changes, different tonal colors are emphasized. Even though the low fundamental pitch is the same, there's quite a difference in timbre. This can be experienced similarly on the mandolin when you move the picking area closer to the bridge or up to the fingerboard.
Roundwound strings give you more of the "Reee" sound. The word "complex" is bantered around to describe the tone, and with it, you get brightness, definition, and "edge." This is great for campfire picking, especially when competing for sound with a group of other acoustic instruments, and necessary for musical styles that use lots of open 5th drones. It projects better, and arguably makes the sound more interesting.
In jazz, we start introducing more complex pitch combinations with the higher chord extensions, like A13b9, D7#9, Bm9, or Eb7#11, and this brightness can create conflict and actually detract from the harmonic power of the chord. You want more fundamental ("BAH" sound) in the string. This is especially true when you amplify; the need for complicated tonal color and projection is simply not an issue.
Of course you have to factor in playing style, instrument construction, and pick structure as well, but in general, the purer fundamental produced in flatwound strings suit playing jazz very well.
Your results may vary.
Posted by Ted at 6:13 AM
August 21, 2008 | "Getting Into Jazz Mandolin" MB20835BCD: Marketing Thoughts
For part of the pre-release marketing efforts of "Getting Into Jazz Mandolin," we were asked to document target customer profiles and fresh angles for the publisher to distribute and make the market aware of the book. It's been an interesting endeavor both philosophically and practically, but with the perpetual self-examination every good author includes as part of the initial writing process, the answer to the questions should not be hard. We thought you might find some of the summary information of interest.
Introduction:
Why Jazz Mandolin?
The last half-century has produced an explosion of interest in guitar, mandolin, banjo, ukulele, and other string instruments. Once relegated to simple folk music, these instruments are now in their heyday of popularity, enjoying an exponentially expanding immersion into a variety of more complex styles, from blues to jazz, to a wide array of world ethnicities.
Though rooted in nearly three centuries of European tradition, only in the last two decades the mandolin is just recently following closely on the heels of its more popular bigger brother, the guitar. From Cowboy chords, to Elvis, to Guitar Hero, the guitar of today is prominently main-stream, arguably surpassing the piano in status. The mandolin is poised to capture and captivate a similarly expanding market and popularity; all that has been missing is the published pedagogies necessary to equip the player to enjoy a broader array of musical styles. Until now...
Jazz is the natural evolving starting point, with its complex rhythmic and harmonic structure; Mel Bay writer Ted Eschliman has developed a strategic method to take the advanced-beginner folk mandolinist into the richly verdant vocabulary of jazz. With this language at his/her fingertips, the player can dig deep not only into jazz, but other equally complex genres, including classical, Broadway, Brazilian Choro, and many other challenging musical styles.
Features/Benefits/Advantages
A clear, consistent course progression. The player starts with something already known (the Major Scale) and develops patterns that can be intuitively expanded. Jazz variations are introduced incrementally, and by the end of the book, the player should be relatively comfortable improvising.
Clear language. Advanced music theory is explained with unpretentious prose, uncomplicated terminology and good humor. A mandolinist could simply play through all the exercises, and at very least, get more proficient with the fretboard, at best build some higher level jazz vocabulary.
Supportive Audio. The 70-minute CD included gives audio examples, as well as limitless opportunity to practice and jam with the exercises. An additional web-based audio page on the JazzMando.com website, "Webtracks" offers expanded opportunity to hear and interact with even more sound tracks and professional artists' interpretations of the music and concepts.
Tab and notation. Exercises are written in both standard notation and mandolin tablature to communicate proper fretboard positions. Fingering markings are included to suggest effective finger placement.
Posted by Ted at 5:44 AM
August 14, 2008 | Tetrachord/Mode Syllabus
As promised last week, a 10-page syllabus of lateral fingerings, extended interval charts, and Mark's practice suggestions to absorb it all. This is Mark Wilson's comprehensive syllabus/primer in mode construction, Tetrachords, and some great practice tips to get all these concepts into your fingers and brain.
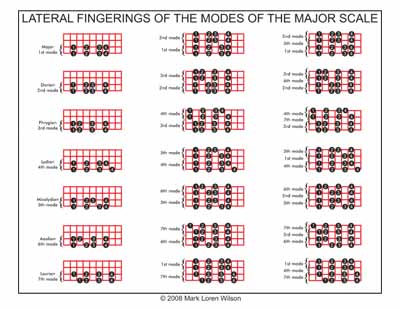
Download this amazing PDF and print off for your files for reference:
PDF Document: Lateral Fingerings of Major Modes
Posted by Ted at 2:25 PM
August 7, 2008 | Even more Tetrachords
A TETRACHORDAL APPROACH TO THE MODES OF THE MAJOR SCALE, Part 2
© 2008 Mark Loren Wilson
PREREQUISITE
The prerequisite for this information is contained in Part One of this lesson title. If you have not read and worked through Part One of this lesson, please do before you go any further.
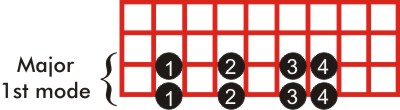
THE FIRST MODE
In Part One of this lesson, we saw how each of the seven modes of the major scale can be divided into two four-note tetrachords. Each tetrachord has four notes and is played on a single string, each note with one of the four fingers of the left hand. An example from Part One is shown below, the first mode of the A Major scale. This scale starts on the G string's 2nd fret. The numbers denote left hand fingering, not the degrees of the scale.
EXTENDING LATERALLY ACROSS THE FINGERBOARD
But what would we do if we wanted to continue an ascending scalar line? The advantage of knowing the modes laterally across all strings of the fingerboard is that your lines can extend longer, and your overall knowledge of the fingerboard becomes more complete.
Since we started with the first mode of the major scale and started on the note A, we ended an A, too. If you were to continue the ascending A Major scale, the next note you would play would be the 2nd degree of the A Major scale, or the note B. This you would play with your first finger. In fact, that note, B, could be seen as the beginning of another eight-note mode, but which mode? Here is the fingering:
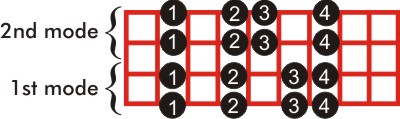
Notice that the mode directly "on top" of the 1st mode is... the 2nd mode! This is a pattern that will repeat, and you will learn to cherish this fact.
THE SECOND MODE
Here is the second mode of the major scale (called Dorian). In A Major, you would start this mode with your first finger on the 2nd degree of the major scale, or B.
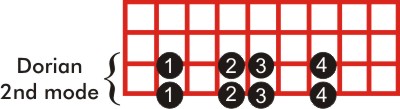
And, here is the fingering for the scale across the entire fingerboard.
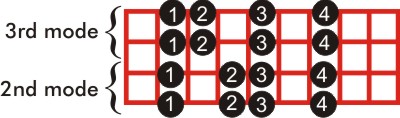
See how the 3rd mode lives directly on top of the 2nd mode? I bet you are starting to recognize the pattern.
THE THIRD MODE
Here is the third mode of the major scale (called Phrygian). In A Major, you would start this mode with your first finger on the 3rd degree of the major scale, or C#.
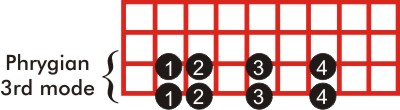
And, here is the fingering for the scale across the entire fingerboard.
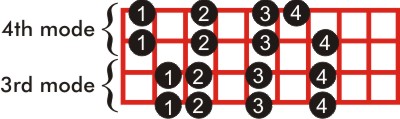
THE FOURTH MODE
Here is the fourth mode of the major scale (called Lydian). In A Major, you would start this mode with your first finger on the 4th degree of the major scale, or D.
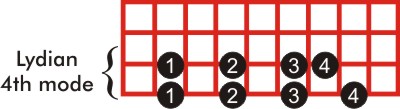
And, here is the fingering for the scale across the entire fingerboard.
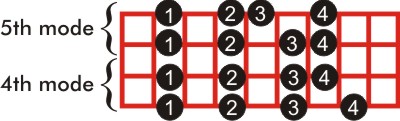
THE FIFTH MODE
Here is the fifth mode of the major scale (called Mixolydian). In A Major, you would start this mode with your first finger on the 5th degree of the major scale, or E.
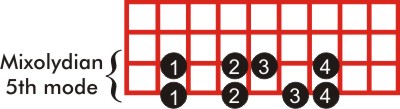
And, here is the fingering for the scale across the entire fingerboard.
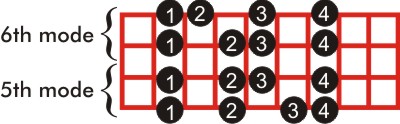
THE SIXTH MODE
Here is the sixth mode of the major scale (called Aeolian). In A Major, you would start this mode with your first finger on the 6th degree of the major scale, or F#.

And, here is the fingering for the scale across the entire fingerboard
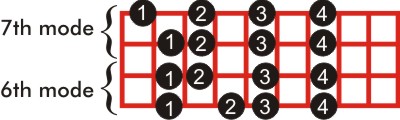
THE SEVENTH MODE
Here is the seventh mode of the major scale (called Locrian). In A Major, you would start this mode with your first finger on the 7th degree of the major scale, or G#.
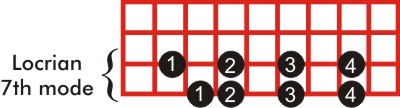
And, here is the fingering for the scale across the entire fingerboard.
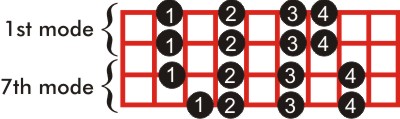
NEED A QUICK'N EASY TWO-FIVE?
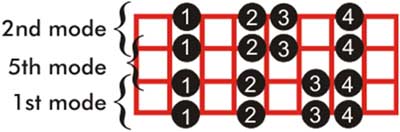
If you ever need a quick 'ii V7 I', here it is. Each mode in this quickie 'ii V7 I' starts with the 4th finger. Put your little finger on the root of the 'ii' chord on the E string, then play the 2nd mode descending one octave. Then right under that first starting note is the starting note for the 5th mode: play the 5th mode descending one octave. Then again right under the starting note for the 5th mode is the starting note for the 1st mode. Play that descending one octave. There you have it. See below.
GETTING IT ALL UNDER YOUR FINGERS
The way to put all this together is to follow a regimen similar to this:
1. Set a metronome to 60 beats a minute. Play quarter notes.
2. Select a key and play only in that key for the entire practice session. It is okay to play in that one key for an entire week and really get the fingering positions nailed down.
3. First, starting with your left hand first finger on the first degree of the scale on the G string, play only one octave of the first mode of the major scale, just like Ex.1 above. Play this ascending and descending at least four times.
4. Next, start again from the G string/1st finger and this time continue up the scale by completing the entire lateral pattern and playing the second octave plus one note, as shown in Ex.1a above. Play this ascending and descending at least four times.
5. Move your finger up to the 2nd degree of the scale on the G string, and play Ex.2 above. Repeat at least four times, ascending and descending.
6. Continue up the scale by completing the entire lateral pattern and playing the second octave plus one note, as shown in Ex.2a above. Play this ascending and descending at least four times.
7. Repeat this process for all the modes starting them on the G string and continuing as far as possible until you cannot reach the frets.
Note that all positions will not be available on the G string in all keys.
Next week: A 10-page syllabus of lateral fingerings, extended interval charts, and Mark's practice suggestions to absorb it all.
Posted by Ted at 7:07 AM

Disclaimer: In the 'Information Age' of the 21st Century,
any fool with a computer, a modem, and an idea can
become a self-professed 'expert." This site does not
come equipped with 'discernment.'
|