« Three-Pronged Education |
Main
| Tetrachord/Mode Syllabus »
 August 7, 2008 | Even more Tetrachords August 7, 2008 | Even more Tetrachords
A TETRACHORDAL APPROACH TO THE MODES OF THE MAJOR SCALE, Part 2
© 2008 Mark Loren Wilson
PREREQUISITE
The prerequisite for this information is contained in Part One of this lesson title. If you have not read and worked through Part One of this lesson, please do before you go any further.
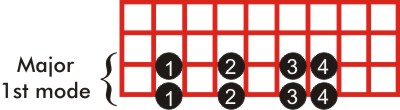
THE FIRST MODE
In Part One of this lesson, we saw how each of the seven modes of the major scale can be divided into two four-note tetrachords. Each tetrachord has four notes and is played on a single string, each note with one of the four fingers of the left hand. An example from Part One is shown below, the first mode of the A Major scale. This scale starts on the G string's 2nd fret. The numbers denote left hand fingering, not the degrees of the scale.
EXTENDING LATERALLY ACROSS THE FINGERBOARD
But what would we do if we wanted to continue an ascending scalar line? The advantage of knowing the modes laterally across all strings of the fingerboard is that your lines can extend longer, and your overall knowledge of the fingerboard becomes more complete.
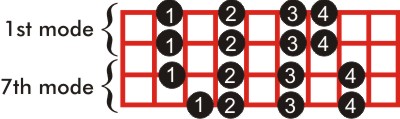
Since we started with the first mode of the major scale and started on the note A, we ended an A, too. If you were to continue the ascending A Major scale, the next note you would play would be the 2nd degree of the A Major scale, or the note B. This you would play with your first finger. In fact, that note, B, could be seen as the beginning of another eight-note mode, but which mode? Here is the fingering:
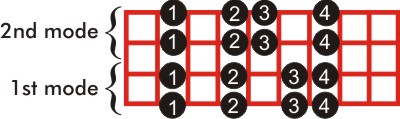
Notice that the mode directly "on top" of the 1st mode is... the 2nd mode! This is a pattern that will repeat, and you will learn to cherish this fact.
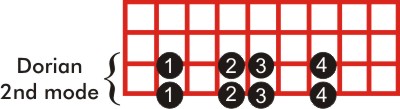
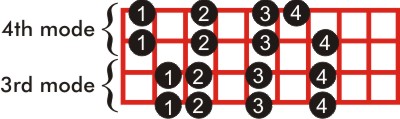
THE SECOND MODE
Here is the second mode of the major scale (called Dorian). In A Major, you would start this mode with your first finger on the 2nd degree of the major scale, or B.
And, here is the fingering for the scale across the entire fingerboard.
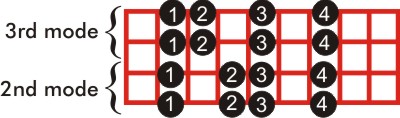
See how the 3rd mode lives directly on top of the 2nd mode? I bet you are starting to recognize the pattern.
THE THIRD MODE
Here is the third mode of the major scale (called Phrygian). In A Major, you would start this mode with your first finger on the 3rd degree of the major scale, or C#.
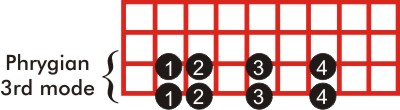
And, here is the fingering for the scale across the entire fingerboard.
THE FOURTH MODE
Here is the fourth mode of the major scale (called Lydian). In A Major, you would start this mode with your first finger on the 4th degree of the major scale, or D.
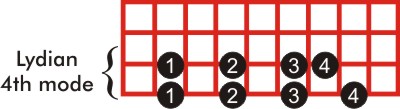
And, here is the fingering for the scale across the entire fingerboard.
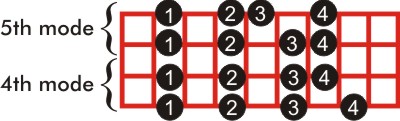
THE FIFTH MODE
Here is the fifth mode of the major scale (called Mixolydian). In A Major, you would start this mode with your first finger on the 5th degree of the major scale, or E.
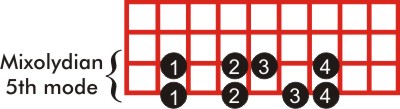
And, here is the fingering for the scale across the entire fingerboard.
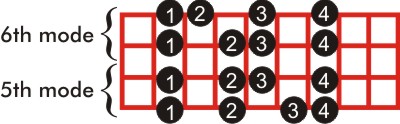
THE SIXTH MODE
Here is the sixth mode of the major scale (called Aeolian). In A Major, you would start this mode with your first finger on the 6th degree of the major scale, or F#.

And, here is the fingering for the scale across the entire fingerboard
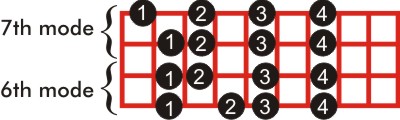
THE SEVENTH MODE
Here is the seventh mode of the major scale (called Locrian). In A Major, you would start this mode with your first finger on the 7th degree of the major scale, or G#.
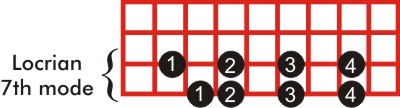
And, here is the fingering for the scale across the entire fingerboard.
NEED A QUICK'N EASY TWO-FIVE?
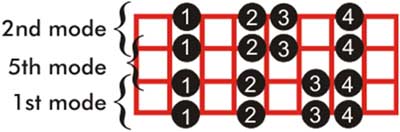
If you ever need a quick 'ii V7 I', here it is. Each mode in this quickie 'ii V7 I' starts with the 4th finger. Put your little finger on the root of the 'ii' chord on the E string, then play the 2nd mode descending one octave. Then right under that first starting note is the starting note for the 5th mode: play the 5th mode descending one octave. Then again right under the starting note for the 5th mode is the starting note for the 1st mode. Play that descending one octave. There you have it. See below.
GETTING IT ALL UNDER YOUR FINGERS
The way to put all this together is to follow a regimen similar to this:
1. Set a metronome to 60 beats a minute. Play quarter notes.
2. Select a key and play only in that key for the entire practice session. It is okay to play in that one key for an entire week and really get the fingering positions nailed down.
3. First, starting with your left hand first finger on the first degree of the scale on the G string, play only one octave of the first mode of the major scale, just like Ex.1 above. Play this ascending and descending at least four times.
4. Next, start again from the G string/1st finger and this time continue up the scale by completing the entire lateral pattern and playing the second octave plus one note, as shown in Ex.1a above. Play this ascending and descending at least four times.
5. Move your finger up to the 2nd degree of the scale on the G string, and play Ex.2 above. Repeat at least four times, ascending and descending.
6. Continue up the scale by completing the entire lateral pattern and playing the second octave plus one note, as shown in Ex.2a above. Play this ascending and descending at least four times.
7. Repeat this process for all the modes starting them on the G string and continuing as far as possible until you cannot reach the frets.
Note that all positions will not be available on the G string in all keys.
Next week: A 10-page syllabus of lateral fingerings, extended interval charts, and Mark's practice suggestions to absorb it all.
Posted by Ted at August 7, 2008 7:07 AM

Disclaimer: In the 'Information Age' of the 21st Century,
any fool with a computer, a modem, and an idea can
become a self-professed 'expert." This site does not
come equipped with 'discernment.'
|