« June 2007 |
Main
| August 2007 »
 July 26, 2007 | Maximizing the "E" Zone
For some players, depending on the way their hands and wrists are built, or simply through developing bad habits early on, the first five or six frets of the E string can sound weak or pinched. The discussion will be very relevant to you if you've played literature on other areas of the fretboard and suddenly, you lose tone when playing anywhere from the first fret "F" to 5th fret A on your E string.
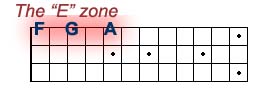
If you've ever fiddled on "Devil's Dream" in the key of A, "Sailor's Hornpipe" in G, or (speaking of devilish) "Blackberry Blossom" in G, this may resonate with you. Some players will transpose Blackberry up a third to B just to give a little better finger flexibility in narrower frets. This may be because of the shorter fret span, but it might also be due to the "angle" issue we'll discuss.
Holding the Left Hand "normally" (whatever that means), your fingers need to be able cross span comfortably from 1st string (E) to 4th string (G), meaning your fingers are generally perpendicular to the neck. This is very comfortable for the lowest strings, but most will find the E string (maybe A, too) a bit cramped, and that means trouble in two areas.
1. Finger pad coverage. Notice you play with more fingertip and less pad with the drastic curve necessary for effective string contact. Less flesh often results in a pinched sound.
2. Finger grip. A perpendicular wrist angle thwarts the maximum control and flexibility the fingers require to not only cover with any degree of strength, but to move in and out of position (see "Ulnar Deviation" below).
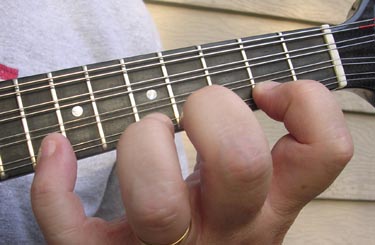
The solution here is quite simple. By curving your hand slightly toward the body of the instrument, adjusting your fingers to angle closer to parallel to the strings, you not only get more finger pad, the wrist will loosen up significantly.
Put your mandolin down and hold out your hand, palm straight up and wiggle your fingers in "air mandolin" motion, tapping your palms with your 3rd and 4th finger. Now, do the same only curve your hand slightly toward the floor. Notice how much less tension there is in your forearms. Also notice your fingers can actually reach farther.

Take this concept of wrist angle, and add "slant" to your fingers as pictured. As you tap on the fingerboard, enjoy the added dexterity this position offers in this string area.
Hmm... Flexibility, control, tone, relaxed. What could be wrong with this? Essentially, there is a point of diminishing returns in that this is not as effective for your lower strings (G & D). You'll want to discover for yourself what the best angle is for you fingers and hand size.
The point is to free your fingers up and relax the wrist. You may be quite surprised at what this does for your tone, especially in the "E-zone."
A Fiddler's Perspective. Interestingly, this issue is compounded in violin, which unlike mandolin, is held with the fingerboard is parallel to the ground (not perpendicular). Nissa Evenson, professional violinist and educator tells us, " you do not want, what is called, "ulnar deviation" Simply put, the pinky-side of the arm (where the Ulna is) should be more or less a straight line from the arm through the hand. The movement of the wrist back-and-forth or left to right is a negative movement when repeating. (Up and down is good!) The placement of the left finger as we are discussing causes this Ulnar Deviation." She tells us many beginning violinists suffer from this, and the habit seems to stick until the opportunity to player in the upper positions of the violin and/or adding vibrato to their playing.
Posted by Ted at 2:00 PM
July 19, 2007 | Moving Horizontally
In the July 2007 issue of Downbeat Magazine, guitar legend Frank Vignola has an interesting Master Class article, "Making the Fingerboard Horizontal." Though the brief 12 accompanying exercises are more relevant to the guitar (you guitarists might want to hunt this issue down) the gist of the article applies to the mandolin, as well.
In the column, Vignola maintains we restrict improvisational liberty when we stick with one area of the fretboard; we worry more about fingering than about sound. He maintains if we think about moving melodies up and down the string instead of across several strings, melodies can be experienced more intuitively. If we think our scale degrees and arpeggios on one string (or two) we nurture a more innate sense, feel, and ear for where these important notes are.
He also shows how you can do parallel 3rds and 6ths intervals in this way. You're probably already doing this; take two notes a 3rd or 6th away on consecutive strings and play them diatonically all the way up the fretboard. Your brain may already be recognizing physical patterns of these distances to be repeated later and in other keys, 2 fret span, 3 frets, 3 frets, 3 frets, etc as you move melody and diatonic 6th up the scale. (This can't be done as easily moving across strings as it is up the string.)
Another thought we'll add for you to ponder is some keys lend themselves better in different positions of the fingerboard. We like doing flat keys in 3rd and 5th position for a couple reasons. First, an Altered Scale (improvised on the dominant chord) fingers better this way, and second, chord melody options are much greater when you can inject chords both above and below the melody in the "horn keys" of Ab, Eb, and Bb.
If the music theory here is beyond your level, don't worry about that last paragraph. Just know that leaving the lower frets can open up some efficiencies you didn't know existed.
The FFcP approach tends to plant you in one fretboard zone early on. As you further develop, you should be thinking about moving your FFcP exercises around. Once you get comfort and familiarity in the higher frets, the next step is working on the transitions. In case you missed it, the second part of the FFcP exercises, "Moving on Up" is exactly that, an opportunity to get out of the basement, but start working on efficient movement from one zone of the fingerboard to the next.
Before you do that, you might experiment with doing scales on just one string, but if you're comfortable with the basic FFcP scales, it's only a matter of moving them around. Also, next time you have the chance to observe a great Gypsy Jazz guitarist (like Frank Vignola), watch the left hand closely; all the greats who follow in the path of Django move quite freely and effectively in maximum use of all regions of the fretboard.
Download PDF: Moving on Up
Posted by Ted at 7:15 AM
July 12, 2007 | Online Notation Resource
This in from JazzMando research correspondent and roving reporter, Charlie Jones, a cool online notation resource, BlankSheetMusic.net. As Charlie puts it, "Yeah, it's something that's not too difficult to do on you're own, but it's sure nice to have the computer do it. The advanced mode lets you tweak the sheets pretty extensively."
You get the ability of modifying cleff, staff, and a number of instrument TAB options. You can also combine both, which can be helpful for documenting your favorite licks or tunes.
Website: BlankSheetMusic
We also have a helpful fingerboard page for keeping track of your chord discoveries with our JazzMando Chord Template; check out this and some of our other free resources in the Popular Downloads section.
http://jazzmando.com/popular_downloads.shtml
Download: JazzMando Chord Template
The price is right!
Posted by Ted at 6:11 AM
July 4, 2007 | Enemies of Sustain
We've had pretty good feedback on the MandolinSessions article published last April, Thinking Good Tone Part 1: What the Pros say about Good Tone. Possibly the single most "make it or break it" factor in good tone lies in the issue of sustain. Three different factors impact whether or not your playing is capable of good sustain, fretting, picking, and Right Hand/Left Hand coordination.
Fretting. When your fingers hold the note, pressure has to be not only powerful enough, but nailed to the "sweet spot" between the frets, and held long enough to blow into the next note. It needs to be set perfectly and can't be cut prematurely. Paul Glasse mentions the magic midway, just enough pressure to bring the tone to its maximum, but light enough to remain fluid.
Picking. It all starts with the pick. You can't have sustained good tone until you start good tone. Proper "snap," enough force to start the tone with confidence and security, even in the soft passages requires impeccable picking. This is why we recommend spending 10 minutes at the start of every practice session. (See Good Tone Part 2 for a terrific exercise to woodshed this in your playing.)
Right Hand/Left Hand Coordination. Putting it all together is a true art. Listen to recordings of John Reischman the hallmark of amazing control, he's the real deal when it comes to dispensing fluidity (and of course accuracy). Typically, the "motor boat" propeller style of bluegrass picking does not require good sustain. The emphasis in sound of this genre will always be projection; the start of a note more profoundly impacts the discernability in this music. In jazz & classical, we seek notes that connect, even at rapid tempos.
Reviewing, the death of sustain is most obvious when you lift the fretting finger prematurely. You can't connect a group of notes into a phrase unless finger pressure lingers long enough. This is remedied best by working on slow, long tones, focusing on keeping the string vibration active until the start of the next note. Picking deficiency isn't quite as obvious, but a healthy pick stroke can't be taken for granted. The third concern, coordination of the two is a bit more complex issue.
Consider a merry-go-round. Activating this classic child's playground equipment requires a coordination of propulsion and proper timing. If you push too late, you obstruct and actually end up slowing the motion down. If you push too soon, you use an improper and inefficient degree of force.
This is no different than your picking. Listen to some poorly executed cross-picking or a failed bluegrass breakdown and you get the picture. A pick timed too late actually stops the sound, and you get "coughs" in the flow of tone.
Pay attention to your pick timing. You never impress your fellow musicians or any audience with bad tone, not even bad tone at lightning tempo. Don't be afraid to slow hard passage down to a comfortable level of speed and control.
Posted by Ted at 7:46 AM

Disclaimer: In the 'Information Age' of the 21st Century,
any fool with a computer, a modem, and an idea can
become a self-professed 'expert." This site does not
come equipped with 'discernment.'
|